Samples Product Information Home Page Pricing Pricing

Feature Templates

This is an example of a Feature template.

This template style is based on the standard Grid style but a block of Grid layouts is combined into a single, larger layout.
This Feature Layout can have a completely different style from the rest of the Grid layouts.

In this example, the underlying Grid is two columns by three rows and the Feature block is two columns by one row and occupies the first row of the Grid.

A Feature block can be any rectangular grouping of any number of columns and rows. It can also be positioned anywhere in the Grid.

Another useful option is to have the Feature block print on only the first page of a category. A common usage of the Feature template is as an introduction to a category.

Data Setup

On the Datasheet, there are four columns which are used to indicate the Printing order, the Sub order (if the product has a table), the Page number the product appears on, and the Position in the Grid.

These columns are optional, it is not necessary to use them to setup the data properly, and they can be enabled or disabled on the Category Editor form.
However, they are useful for getting a better understanding of where each data row prints on the page.

In this example, which contains the data in the page sample above, the Position column has been highlighted to show that the first 5 rows of data are on Page 2 of the catalog. Because the option to have the Feature on the first page only has been used, the second highlighted block indicates 6 rows on Page 3.
In other words, a 2x3 Grid will have 6 layouts on a page. If the Feature block takes up two of those, then there will only be 5 layouts on a page.


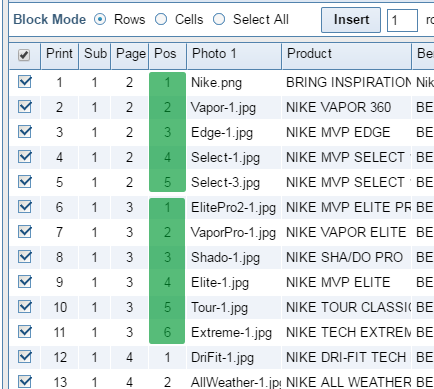
It is important to know that the Feature item will always occupy Position 1 in the data, regardless of where it is on the page. In the page example above, the Feature block happens to be in the first spot (counting from top-left to bottom-right) on the page but, if it were to be repositioned to print in the bottom row of the Grid, the data would still need to be entered into the row labelled as Postion 1.
If the Feature were to be used on every page, then the pattern of Position numbers would be 1 through 5, repeating for all items in the category, and the Feature data would be in every Position 1 row.

Template Setup


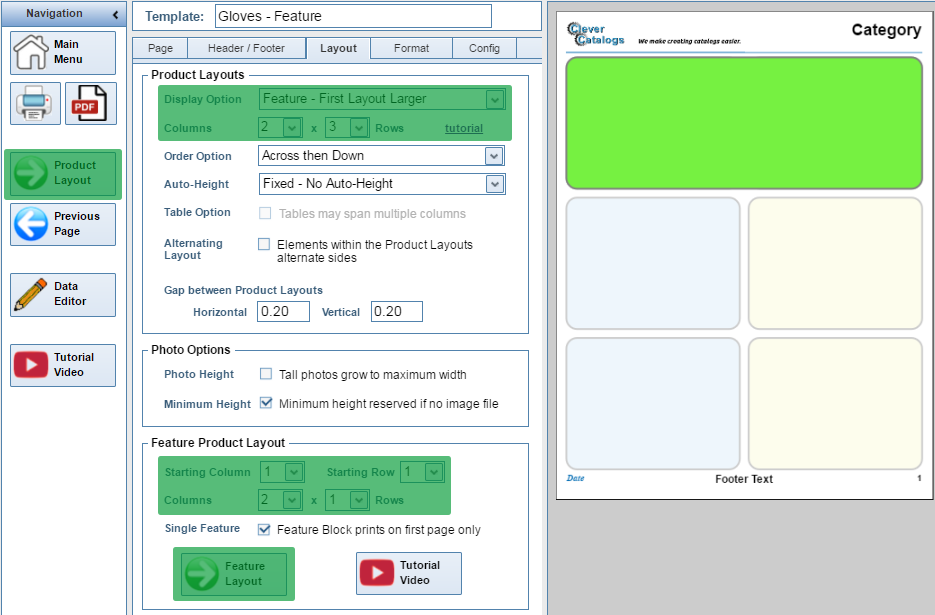
Creating a Feature template is not much different from creating a Standard Grid template.
Begin by setting the Display option to Feature, and then select the number of columns and rows which form the underlying grid.
Next, in the Feature Product Layout section, set the size of the Feature Layout in columns and rows, and also the starting position (the upper-left corner) for the Feature Layout within the grid.

To design the actual layout for the Feature, click the Feature Layout button. To design the Standard Layouts, click the Product Layout button as you would for any Grid template.


Return to Tutorial Selection or continue to the next tutorial: Summary Template