 |
 |
 |
 |
 |
Data Form Configuration
|
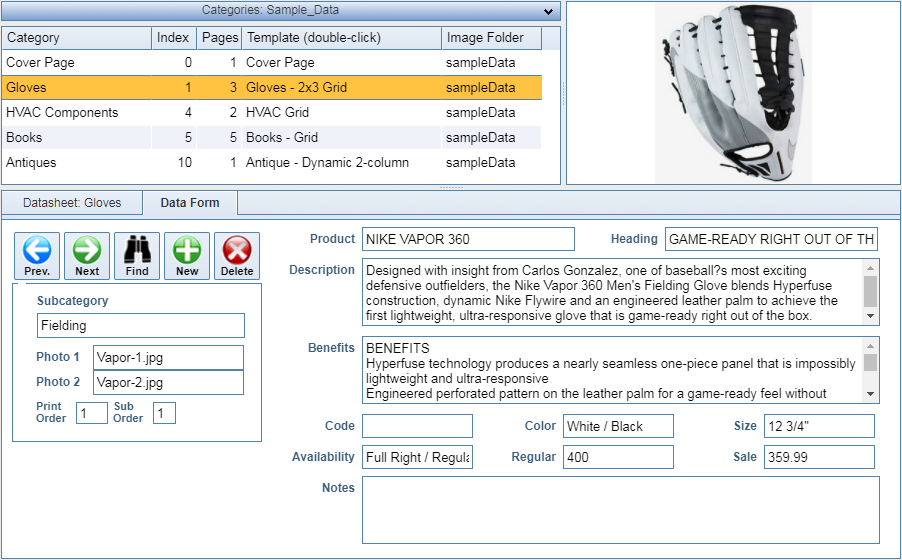
The Data Form is an alternative to the Datasheet. Like the Datasheet, it can be customized for each category. The screenshot below shows a Data Form with several different types of data cells. |
|
|
NOTE: One of the first things you should know about customizing the form is that if you have any difficulties, all you have to do is Contact Us and we can setup the form for you. |
Configuration
|
Click the Category Editor button to open the page where you will select the fields/columns that you want to be visible on the Data Editor form. |
|
|
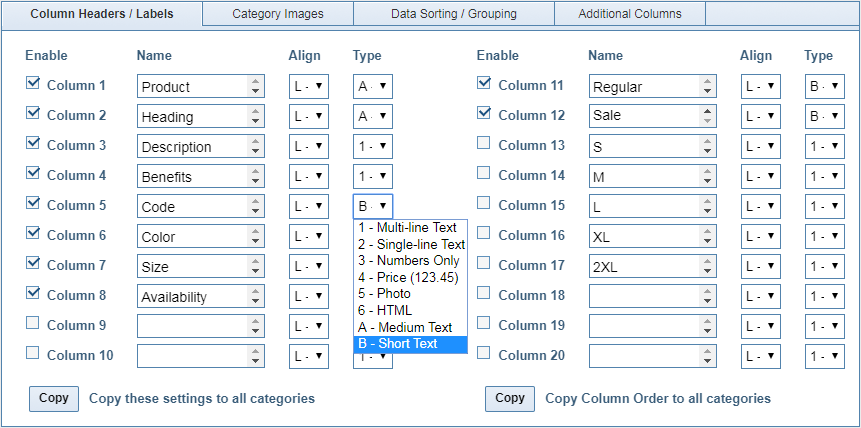
On the Column Headers / Labels tab, use the Enable checkboxes to select the fields/columns you want. Most users will use the same configuration for every category, so the Copy button at the bottom of the page can be used to copy the settings made for one category to all the others. Enter the text you want displayed as the field label in the Name column. This text will also appear in the Column Headers on the Datasheet and is the also the text that will print in the PDF if you include the labels in your template design. The label can hold up to 255 characters and can be multiple lines. On the Datasheet, the full text will appear in the Column Header, but it will be truncated to 12 characters on the Data Form. Some of the selections under the Type column apply to the Datasheet only, the Data Form only, or both.
For Data Entry purposes, there is no difference between the Cell Types. All cells can hold an unlimited amount of text. On the Data Form, the Single-line, Medium, and Short Text fields all provide a single-line data field, the only difference is that they are full-width, half-width, and one-third-width of the form, so that you can optimize the space or organize the fields in a logical manner. |
Editing Data
|
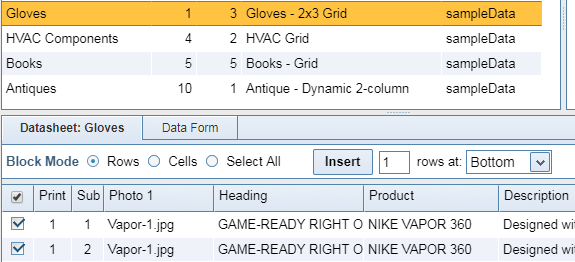
The Datasheet and the Data Form are linked. If you change the text in any cell on the Datasheet, that same change is made immediately on the Data Form, and vice versa. Also, if you click to select and highlight any row in the Datasheet, when you switch to the Data Form, that selected record will be displayed. The same linkage applies to the order of the columns/fields. On the Datasheet, you can change the order of the columns by clicking any column header and dragging the column to a new position. Remember to click the Save Columns button when you do this, otherwise those changes will be lost when you exit the Datasheet. If you click the Save Columns button after changing the order of the columns, when you next open the Data Form, you will find that the order of the fields matches the order of the columns on the Datasheet. |
Adding New Records
|
|
Finding Records
|
The Prev. and Next buttons are a convenient way to cycle through the records in their printing order. If a filter is set in the Datasheet mode to restrict the records in the Datasheet to a specific set of data, then the Prev. and Next buttons will cycle through only that filtered set of records. Many users will find it convenient to switch back to the Datasheet to select an individual record for the Data Form, but there is also a Find button on the Data Form which allows searching for a specific string of text. If more than one matching record is found, the Previous and Next buttons on the Find dialog will cycle through those found records. |