 |
 |
 |
 |
 |
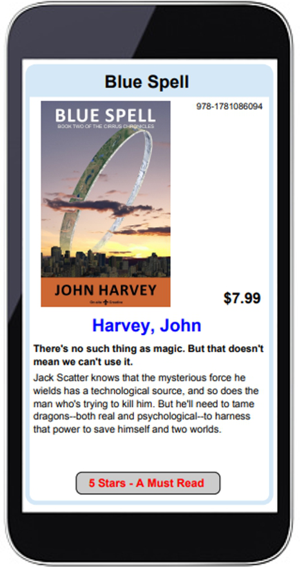
Planning - Product Photos
|
|
Image Size
|
One of the most common questions we receive is - How big should my images be? The exact size of the images files is not that important because the application will
automatically adjust the images to fit the allocated space. However, some users are just looking for a number so the advice we give is: These parameters are going to work well for the majority of users and I'll describe an easy method for creating images within those values but first I'll demonstrate why it is important to reduce the size of your images. Begin by opening the first PDF below. Can you tell the difference between the two images without zooming in? The document itself is formatted to 8 inches wide. The image on the left has been formatted to print at 1200 dpi at a width of 2.5 inches, very close to what it will actually print at. The image on the right is formatted to 96 dpi and 400 pixels wide. If you are viewing the PDF on a typical wide-screen monitor or tablet, chances are it is somewhere in the range of 300 to 500 pixels wide. If you zoom in, you will start to notice some differences in the finer details. The biggest difference though is the size of the PDF file. Try the next two examples to compare the loading time of a file that uses only high-resolution images compared to one that uses only lower resolution. There will be a noticeable difference in how long it takes to open the files, and that's just for two images. If your catalog has hundreds of high-resolution images, your customers could be waiting several minutes while the file opens. So, the better answer to the question of the size of the photos is that they should be small and fast enough to provide the best viewing experience for your customer while being large enough to show important detail. If you will need to create two sets of images - one for high-resolution printing and another for lower-resolution on-screen viewing, continue reading this tutorial. Otherwise, you can skip directly to the tutorial for Resizing Photos now.
On the Category Editor form, there is a function which will make it easy to create and switch between two sets of images.
For some users, creating Image Sub-Folders will be useful for organizing large numbers of photos. For those who want two sets of images, the procedure will be as
follows. First, create two Sub-Folders, one for higher and one for lower resolution images. Before uploading photos on the Data Editor form, select the appropriate
folder using the drop-down selector. On the Data Editor, use the Photo Uploader to upload images into the currently selected folder. Return to the Category Editor
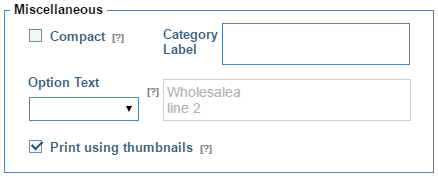
and select the other Sub-Folder and then upload the next set of images back on the Data Editor form. For some users, there is a shortcut that may work just as well. On the Printing page, there is an option for printing using thumbnails. When you upload photos, thumbnails are automatically created. These are shown instead of the original image in the Photo Selection grid and in the Preview Box on the Data Editor form to improve performance. |

Return to Tutorial Selection or continue to the next tutorial: Resizing Photos