 |
 |
 |
 |
 |
Resizing Photos
CleverCat automatically resizes images to fit the allocated space in a layout. However, the full image data is written into the PDF file, even if the image dimensions
have been reduced.
The larger the photos, the larger the final PDF document will be and it will take more time to download and open. To improve the viewer's experience, you should reduce
the size of your photos to be only as large as they need to be to show enough detail.
That's going to be different for every user. Some will want high-resolution images for printing a paper copy of their catalog while others will want a document which
downloads and opens very quickly.
Image files directly from a digital camera can be 5,000kb or larger. For most users creating catalogs for viewing on screen, reducing images to 400 pixels wide at 96dpi
will produce good image quality and high performance. These image files will only be in the range of 20Kb to 40Kb.
For most users who are printing paper catalogs, reducing images files to under 200Kb will produce good image quality without creating a document which is too large to
email.
Some users will need higher image quality though and their images may need to be in the 1,000Kb range. CleverCat can print images even larger than this but there is an upper limit to the size of the PDF document. It's not a fixed number as it depends on many different factors but expect it to fall in the 300Mb range. If your catalog needs to be larger than this, it will be necessary to divide your data into categories, print blocks of categories smaller than 300Mb, download those documents to your computer and combine them into a single document using a utility such as PDF Binder.
Most Photo-Editing software can resize your image files but there are some utilities which are made just for this purpose. In this tutorial, I'm using the FastStone Photo Resizer.
FastStone Photo Resizer
Begin by selecting the folder which contains your original images. Use the Add buttons to move the images you want to convert to the Input List. Select an Output folder for the converted images and check the Use Advanced Options checkbox.

|
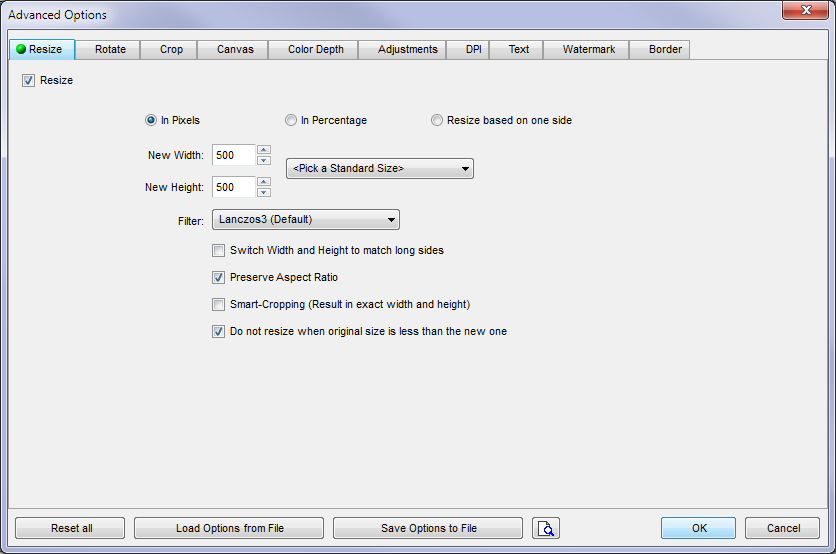
On the Advanced Options form, select the Resize tab. On this tab, you'll set the maximum dimensions of the image, in pixels.
For viewing on-screen, I typically use 400 as the maximum value for both Width and Height. For printing paper catalogs, pixels is not a value that relates well
to printed dimensions so try a few different values or use the percentage option. In the last step you'll be shown the resulting file size so you can easily go back
and reprocess the files if needed.
Also, be sure to check the Do not resize checkbox to prevent adjusting images which are already smaller than the maximum values.
|
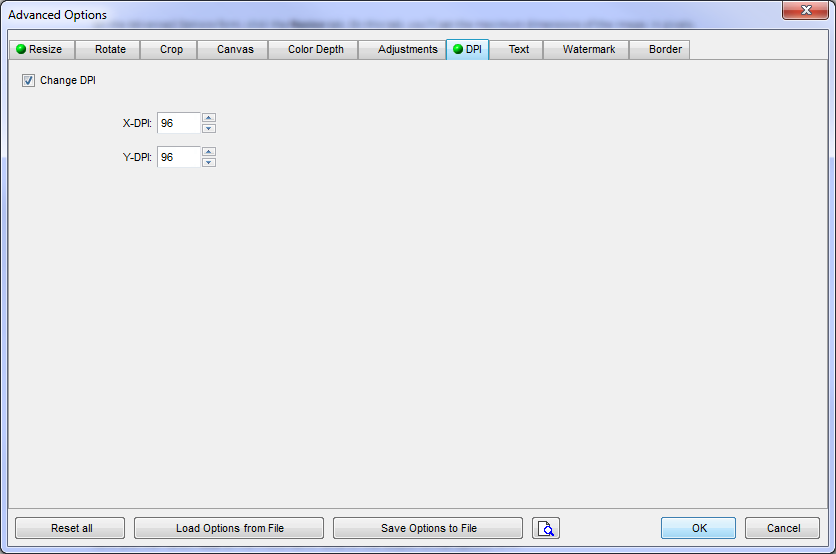
If you are resizing images for on-screen viewing, select the DPI tab. Change the values to 96dpi. Do not use this step if you are resizing images for printing a paper catalog.
|
You can now click the Convert button on the Main Form and your selected images will be resized.

|
Both the old and the new size will be shown in the conversion report.
Remember, the total, combined sizes of all the images will be very close to the final size of the PDF document. As a general rule, 10Mb to 20Mb is the largest that
you would want to send to someone in an email or have as a link on your website. 50Mb to 100Mb is suitable for higher-resolution printing. If you need to go larger
than 300Mb, you will need to print in smaller chunks and recombine those smaller documents on your own computer.
Return to Tutorial Selection or visit Faststone's site: FastStone Photo Resizer